Applied Markets
Installed Gases
Project Details
https://blog.naver.com/rs-korea1/223246205108Continuing from the last blog post, I am posting an installation example in Pohang City again.
The difficult itinerary of the past included the sewage sludge recycling facility here in Pohang City. Who would have thought it would return in such a meaningful way? Last time, the editorial was too long due to lack of photos, but this time I will start right away. --- Installer: Pohang City Sewage Sludge Recycling Facility Installation Location and Equipment Sewage Sludge Entry: FIX800 O2 H2S EX 1set and outdoor status board Dry sludge storage tank: FIX800 CO and high-end pretreatment equipment and self-supporting status board Construction schedule: 2 people, 2 units, 1 day Installation---First, let's find out what a sewage sludge recycling facility is.
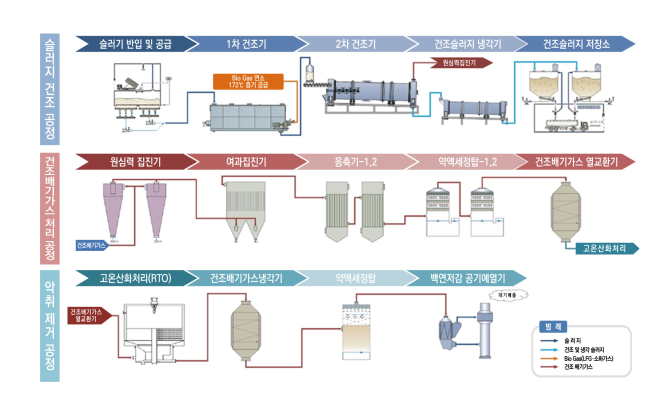
Photo source: Sudokwon Landfill Management Corporation As always, I will summarize information that is not detailed to the best of my knowledge. To put it very simply, sewage sludge is a collection of food wastewater (or food wastewater for short) that comes down from the sink of each household. The facility that processes the sludge collected here and turns it into resources is called a sewage recycling facility. You can think of it in the same context as the livestock waste treatment facility that I explained before by writing down the chemical formula. https://blog.naver.com/rs-korea1/223196647674 The reason I added the link is not because I don't want to write it down again. Please think of it as my hope that our posts will increase the number of views evenly.
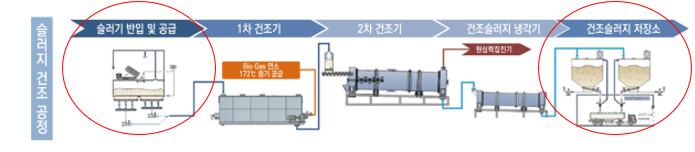
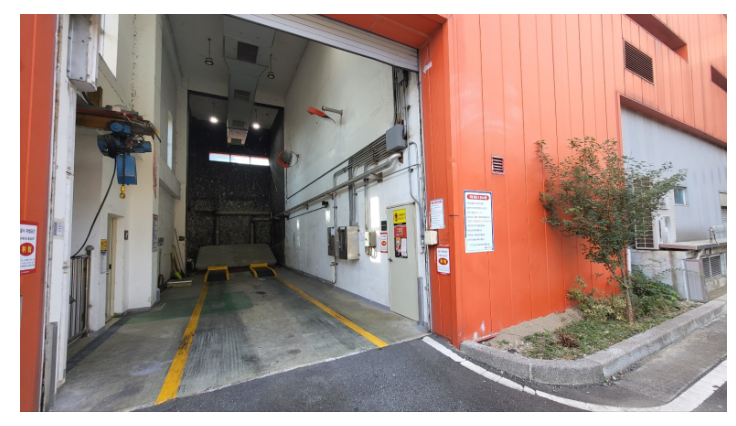
The points we will install this time are the above two locations. Sludge entry area: The sludge entry area, which is full of bad smells and explosive gases, becomes an enclosed space by lowering the shutter after the introduction process is completed. The site plans to install a gas meter for internal worker safety.
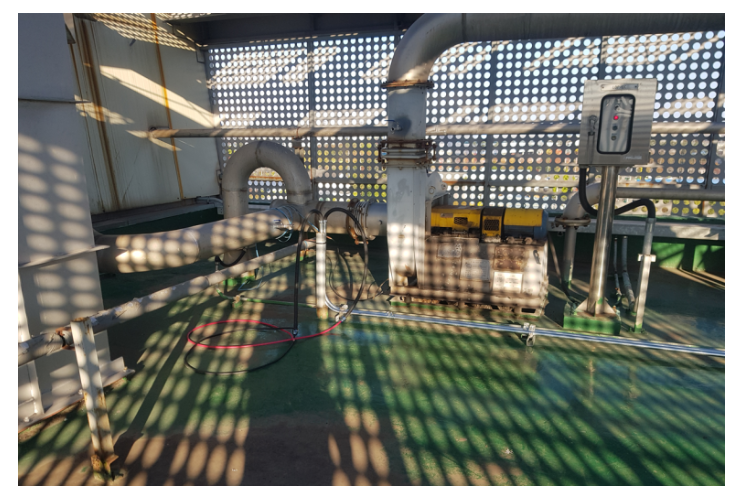
2. Dried goods storage tank: This is a warehouse where dried goods that have been heat treated in the delivery area are stored. You can think of the green urethane floor as one giant tank. It is said that fires can occur even with a small ignition point due to flammable gases such as methane generated from dried sludge just before recycling. To prepare for a fire, we plan to measure the representative combustion gas CO.
Since we had already discussed installation points and power supply methods through several meetings, the process was easy on the day of work.
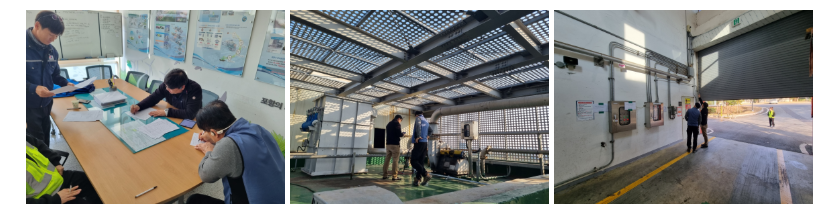
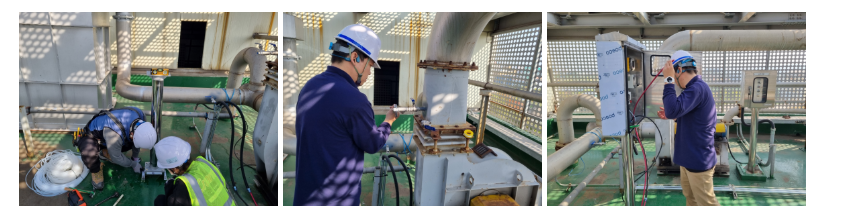
Complete safety training and brief the construction team and site personnel on the installation plan and sequence. We plan to divide into two groups and defeat each location individually. Although the contests were held simultaneously, we will split them one by one and start taking photos from location number 1. Installation of complex gas measuring device at sludge input site

1. After drilling into the concrete wall, install the electronic signboard first. 2. For power supply, we will use the outlet for the exhaust fan behind the wall. Change the one-prong outlet to a two-prong outlet so that it can be used as a spare.3. Install the measuring device and cut the wire length.
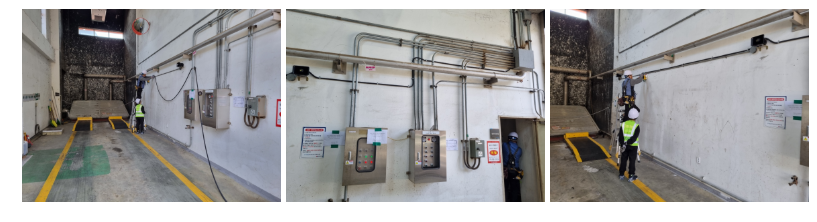
4. Begin attaching the ends based on the cut wire. 5. Work with beautiful birds so as not to disturb the existing facilities. 6. Lastly, just connect the electronic display board and FIX800 and you're done. It's easy, right?

2. Installation of dry sludge storage tank CO meter
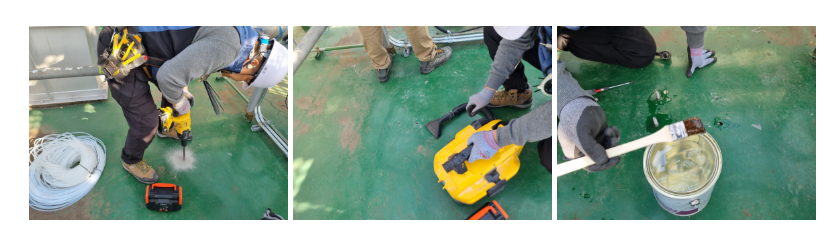
The site is scheduled to be equipped with a self-supporting suspension enclosure and pre-treatment equipment, so anchor work will be carried out first. Drill holes using a hammer drill according to the length of the anchor bolt. Clean the perforated area and surrounding dust. Re-waterproof the area around the waterproof paint that may be lifted due to the drilling work.
4. Install the anchor and proceed with horizontal work. 5. Perform piping work to connect the GAS IN/OUT hoses to the front (positive pressure) and rear (negative pressure) ends of the blower. The port in question had been welded by prior agreement during the meeting. 6. Connect the pre-installed 220V power line and 4-20ma signal line. Unfortunately, due to scheduling conflicts with the electrical facilities team, power is not supplied immediately.
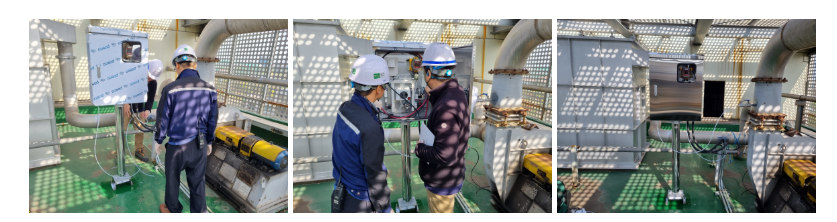
7. Connect the durable PTFE hose to the existing pipe. 8. We provide product training and guidance on how to use the product to the person in charge.9. This is the finished product. Ta-da. After taking the picture, I cleaned up the conduit and gas line with cable ties, but it's a shame I didn't take a picture after that. You said the power supply wasn't on yet, but how did you do a test run?

This construction involved two slightly different types of construction being carried out simultaneously at one site. Because all the details were coordinated in advance through due diligence and several meetings, the actual construction was able to be completed very simply. I once again feel the importance of prior work. I think I can tell you everything with pictures today, so I'll stop here. If you need gas measurement, please contact us.

For inquiries about the installation, trial run, and demo products of gas meters and environmental measuring instruments, please contact us at the business card address above at any time. Based on weekday working hours (9-6 closed on national holidays)
![[레이먼드] 질소 및 유해가스 취급 회사 가스측정기 적용 사례](https://wandi.co.kr/storage/construction-cases/IfuECQXUXReCfxwS1GJfQ92sLqFkBugCvexOwUA3.jpg)
![[브이피이코리아] 종합병원 밀폐공간 저산소 경보 장치 설치_O2 측정기 & 전광판](https://wandi.co.kr/storage/construction-cases/w3Mzy8zuDnzvDwNsPBVkcVGeOWuSfBWqzPAhCE6w.jpg)
![[레이먼드] 소화가스방호구역 CO2 측정기 설치사례](https://wandi.co.kr/storage/construction-cases/CiIzx6d9UgN3yQeJLKrxha2RdCQBuhhpIiMaSbGH.jpg)
![[브이피이코리아] 인큐베이터 배양기 이산화탄소 CO2 측정기 납품 사례](https://wandi.co.kr/storage/construction-cases/g3COR4VakYtyd8hGZfeuPQXQJ6MOecTJSIUiLpyh.jpg)
![[브이피이코리아] 대학교 건물 탄산가스 보관실 O2, CO2 가스 감지기 설치](https://wandi.co.kr/storage/construction-cases/eGIlJnmRzq639S44v7lnOOmZENn7NV93FO1d9vF9.jpg)